How Can We Help?
How to Segment Contacts
Segmentation is one of the defining factors of effective email marketing and messaging. With the right messaging, to the right group of people, at the right time, you can reach your target audience and aim to achieve the ideal marketing for your business.
Segmentation allows you to manage your contacts in a meaningful way, sending them the messages they’re interested in, to take the actions you want them to take. Personalize their experience, and they’ll keep coming back for more.
In Optinize, segmentation is built and designed through lists, tags and custom fields. You have segmentation opportunities at your disposal throughout the platform to segment your contacts with precision and efficacy.
Do not let the ways to segment intimidate you, it is easier than you might think to execute an effective segmentation strategy that uses all three capabilities.
This guide will run you through the basics of lists, tags and custom fields, and explain how to use these functions together in order to segment your contacts like a pro, improving the precision of your targeted marketing efforts and boosting the quality of personalization in your messaging.
Let’s dive in!
Segmentation 101
Segmentation is the act of grouping your contacts by either contact details and/or actions. The main goal of segmentation is to send targeted messaging.
Contact details is a quality or feature about a contact.
Example: Interests, Budget, Contact Location
An action is part of contacts’ behavior when interacting with your business.
Example: Opened campaign, clicked link, visited page
Behavior-based segmentation is key, because when you segment by behavior you’re not only listening to what your customers are telling you they want, you’re also monitoring what they actually do.
The Segment builder is designed to help you combine the use of lists, tags and custom fields to segment contacts primarily by behavior, as well as contact details.
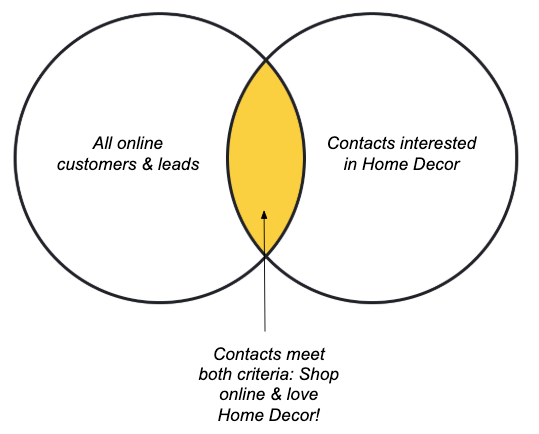
To understand how to use all three functions together effectively, think of segmentation as a venn diagram. This will help you find the contacts that are most relevant for the messages you send.
Let’s use the following example:
A boutique carries clothing, stationery, and home decor. They sell these items in a brick & mortar location, as well as online.
There are many product types, many ways to shop, and many different types of shoppers. So how can we segment?
We can segment by their behavior – if they spend a lot of time on the website, and open your emails, maybe they’re waiting for an online coupon.
We can segment by location, or geography. Are they local, and visiting the store? Or, do they primarily shop online?
Maybe younger customers are more interested in apparel, while your older customers shop more home decor. Demographics data can help target the right audience!
We can segment by product type, a type of Need. What items are they most interested in?
Finally, we can segment contacts into customers and prospects – we’ll want to personalize our efforts for these different groups. You’ll market differently to a returning customer than a first time shopper.
Different segments of contacts will respond to different messaging. Some may want content about home decor. Local contacts may be interested in an in-person event. And everyone loves a coupon – but you may want to run a promotion on a particular product, versus the entire store.
Once you have all of this information on a contact you will want to use the Segment Builder. The segment builder appears throughout the entire Optinize platform: any time you have to make a decision about your audience, or your process flow, you will end up working with the Segment Builder.
If you collect data through custom fields, you can use the Segment Builder to sort your contacts using that data. The Segment Builder allows you to create a dynamic, always-updated version of Venn Diagrams to your perfect audience.
Let’s take a moment to visualize it:
Contacts Organization
Lists are the broadest form of contact organization. Each list should represent a communication type.
Best Practice: Maintain a primary/master list, and use tags and custom fields to further segment.
Tags are like badges for your contacts. They represent data that can quickly change, providing you with a snapshot of how your contacts are interacting with your business.
Best Practice: Organize them in categories to understand interests, behaviors, engagement level and basic info. Use tags to organize, start automation, etc.
Custom fields store data that is unique to each contact. They represent data that is either permanent or unlikely to change often/easily.
Best Practice: Create fields for information you need across all contacts. IE: birthdays, instagram handle, preferred workout class, pets name
Lists vs. Segments
A single list is intended to represent a broad spectrum of contacts who have one main interest in common. For example, you may have a Customer list, which represents a segment of your contacts who share a common interest in your business as customers. And you may have a Prospect list, which represents a segment of your contacts who share a common general interest in your business. When a contact from your Prospect list purchases a product, you move that contact to your Customers list.
Lists help you send the right type of message to the right group of contacts, especially if you need to send a number of varying communications. For example, if you’re running multiple businesses from within one Optinize account, or if you sell a diverse array of unrelated products, lists can help you organize your contacts into groups according to the type of messaging that is most appropriate for them.
Note: In Optinize, a contact is represented by an email address, web push token, phone number or unique identifier (Set by you). Inside a list two contacts cannot have the same email address, web push token, phone number or unique identifier. However, a contact with the same email address, web push token, phone number or unique identifier can exist on a different list.
Segment is a dynamic group of people grouped by a set of rules. The number of people in the segment varies based on the people that “meet” to your set of rules. For example, if you created a segment of people who visited your website in the last 24 hours, people will go in and out of the segment during the 24 hours period.
Note: In Optinize, contacts move between segments in the same list and not between lists. So if you’ll want to create the same segment for leads (list 1) and for customers (list 2), you’ll need to create the same segment for each list separately.
Tags
The primary purpose of tags is to organize the contacts in your database. Tags allow you to be fast and flexible with organization and segmentation based on different pieces of information on the contact. When your contact database is well-organized, you can easily access segments of contacts on the fly, so tags in Optinize are meant to provide a non-cumbersome way to quickly group your contacts.
You are able to filter and search for your tags through multiple places in the platform but also, they are easily accessible from the individual contact profile.
Best Practice: We don’t recommend using tags for everything, but below is a list of specific types of tags we do recommend using, based on your needs.
Best Practice: We do recommend developing a tagging method of organization prior to building tags in the system. This will allow you to keep your tags in check from contact to contact, like the example given below!
Best Practice: When naming your tags, it helps to include the tag category so you always have context around which attribute the tag tracks and why the tag exists. That looks like this:
Tag Category – Name of Tag
- Source tag – Use to track where your leads originated from. (Example: Source – Live Event)
- Engagement tag – Use to indicate the level of engagement of a specific contact. You can use these tags to track how engaged or disengaged a contact may be. The tags will update based on contacts actions and engagements with your content or lack thereof.
- Product tag – Indicates which product a contact has purchased. (Example: Product – Online Course, or Product – Tee Shirt). For example, you might have a Customer segment in which all of those contacts are tagged with the product they purchased.
- Action tag – action tags are related to status tags; they signify behavior that alters a contact’s status. (Example: Action – Visited a product page, Action – Downloaded ebook, Action – Attended event.) This type of tag can be used to describe any kind of contact behavior.
Adding a tag is super easy, simply go to contacts tag and click on “add new tag”. You can then add this tag manually to a customer or a list of customers using multiple selection and also use the tag to trigger an automation.
Trigger automation based on tag – Use tags to trigger automations with the “Tag is added” and “Tag is removed” start triggers, end automations, or serve as criteria to achieve a Goal that advances contacts to specific steps within automations. Note: When using the addition of a tag to trigger an automation, the tag must be added after the automation is created; it will not be triggered retroactively for contacts who previously were assigned the tag
Custom Fields
Custom fields are the most targeted and personalized level of segmentation. There’s no way to achieve a high level of customization without custom fields!
Custom fields help you personalize the information you collect across all contact profiles. For example, you can create a date-based custom field for Birthday, and collect and store all of your contact’s birthdays for future segmentation. You may want to look specifically at the birthday for one contact, while knowing that the data exists on all profiles.
Custom fields are beneficial for storing information that you want and/or need about your contacts. They are helpful for segmenting via conditional content, building advanced searches, starting automations, and generally grouping contacts. You can use them any place in the platform that you find the segment builder.
There are a few different types of custom fields that you typically see on contact forms:
Text field – Single line input, generally short and succinct. This type of custom field is used to collect information such as your name and email address.
Number fields – Date fields are similar to text fields in Optinize, but are used to collect information using integers only. Other characters are now allowed.
Date fields – Used to collect information in the form of a specific date (month, day and year).
List field – A list field is a drop-down display of previously unseen data revealed when you click; allows you to scroll through and select your choice from the menu.
YES/NO field – a simple field with 2 options available: yes or no.
Tags vs. Custom Fields
In many ways, tags and custom fields have opposite strengths. It’s not always easy to determine which segmentation method would work best for a particular tactic in your marketing strategy.
Whereas tags represent temporary data and are therefore easy to apply and remove, custom fields represent permanent data that is less easily changed. Think of tags as your clothes—you put them on and take them off daily. They represent contacts’ recent statuses and actions.
Custom fields are like your DNA—your physical make-up, which doesn’t change. Custom fields represent data that is permanent or not easily changed, such as a contact’s home address or birth date.
Tags and custom fields also differ in their visibility within and outside of our platform. Tags are only visible internally; you can log into Optinize to see which tags you have applied to contacts’ records, but contacts cannot see which tags are currently or historically have been applied to them.
Custom fields display information that is visible both internally and externally. You can view custom field data internally when you log into Optinize, and you can represent custom field data in your external messaging to contacts through the use of personalization tags.
One final distinction between tags and custom fields is the way they trigger action. To trigger action with tags, you first have to swap out one tag with another, or swap the nonexistence of a tag for the existence of a tag.
For instance, let’s say you have a “Status – Confirmed” tag for contacts who have confirmed their attendance at an upcoming event, a “Status – Unconfirmed” tag for contacts who have not yet confirmed, and an automation that sends different messaging to those contacts, based on their status tags. So when a contact is tagged as “Confirmed” you must remember to remove the tag “Unconfirmed,” otherwise that contact will receive information meant for both confirmed and unconfirmed contacts.
Some custom fields (such as YES/NO fields), however, are an OR functionality by default. This means that a contact can only have one status at a time—either Confirmed or Unconfirmed. So when you update a contact’s status from one to the other with a custom field, the previous status will automatically be removed…no tag swapping required!
Where Lists, Tags and Custom Fields Live
The contact profile is a powerful place. Not only does all of the data from your contact live there but the ability to see all of their progress with your content and the platform does, too. It is here that you can see all Lists and Tags specific to that contact. You also have visibility into all of the information that you have collected via your custom fields. Now that you have gathered all of this information in one place, you have the ability to tailor your message to this contact in a way that makes the most sense for their interests. This all lives on contact profiles! The contact profile provides you a snapshot into the customer’s journey with your business.
Summary
Think back to earlier when we created our boutique’s venn diagram. We segmented the perfect group of contacts, so that they received the message most targeted to them. Segmentation is the most effective way to reach your contacts with the right content at the right time, whether it be through campaigns or automations.